Making A Seating Chart That Doesn’t Stress You Out
Make it stand out
Few wedding tasks spark as much anxiety as the seating chart—and it’s not because it’s difficult, but because emotions tend to get involved. Family dynamics, friend groups, and expectations all come into play.
The good news? Seating charts don’t have to be stressful if you approach them methodically and wait until the right moment.
In this post, I’ll walk you through a step-by-step process for creating a seating chart that’s practical, drama-free, and easy to manage—using the same system I’ve used personally and professionally.
How to Organize
First looks tend to spark strong opinions, but after years of working with wedding planning companies and coordinating on my own, I genuinely believe they’re one of the best decisions you can make for your day.
When to start
Table vs seat assignments
Common mistakes
Spreadsheet link - make a copy and then use it to organize your seating chart
How to avoid drama
When to Finalize
First looks tend to spark strong opinions, but after years of working with wedding planning companies and coordinating on my own, I genuinely believe they’re one of the best decisions you can make for your day.Few wedding tasks spark as much anxiety as the seating chart—and it’s not because it’s difficult, but because emotions tend to get involved. Family dynamics, friend groups, and expectations all come into play.
The good news? Seating charts don’t have to be stressful if you approach them methodically and wait until the right moment.
In this post, I’ll walk you through a step-by-step process for creating a seating chart that’s practical, drama-free, and easy to manage—using the same system I’ve used personally and professionally.
DIY Options
In this post, I’ll walk you through a step-by-step process for creating a seating chart that’s practical, drama-free, and easy to manage—using the same system I’ve used personally and professionally.
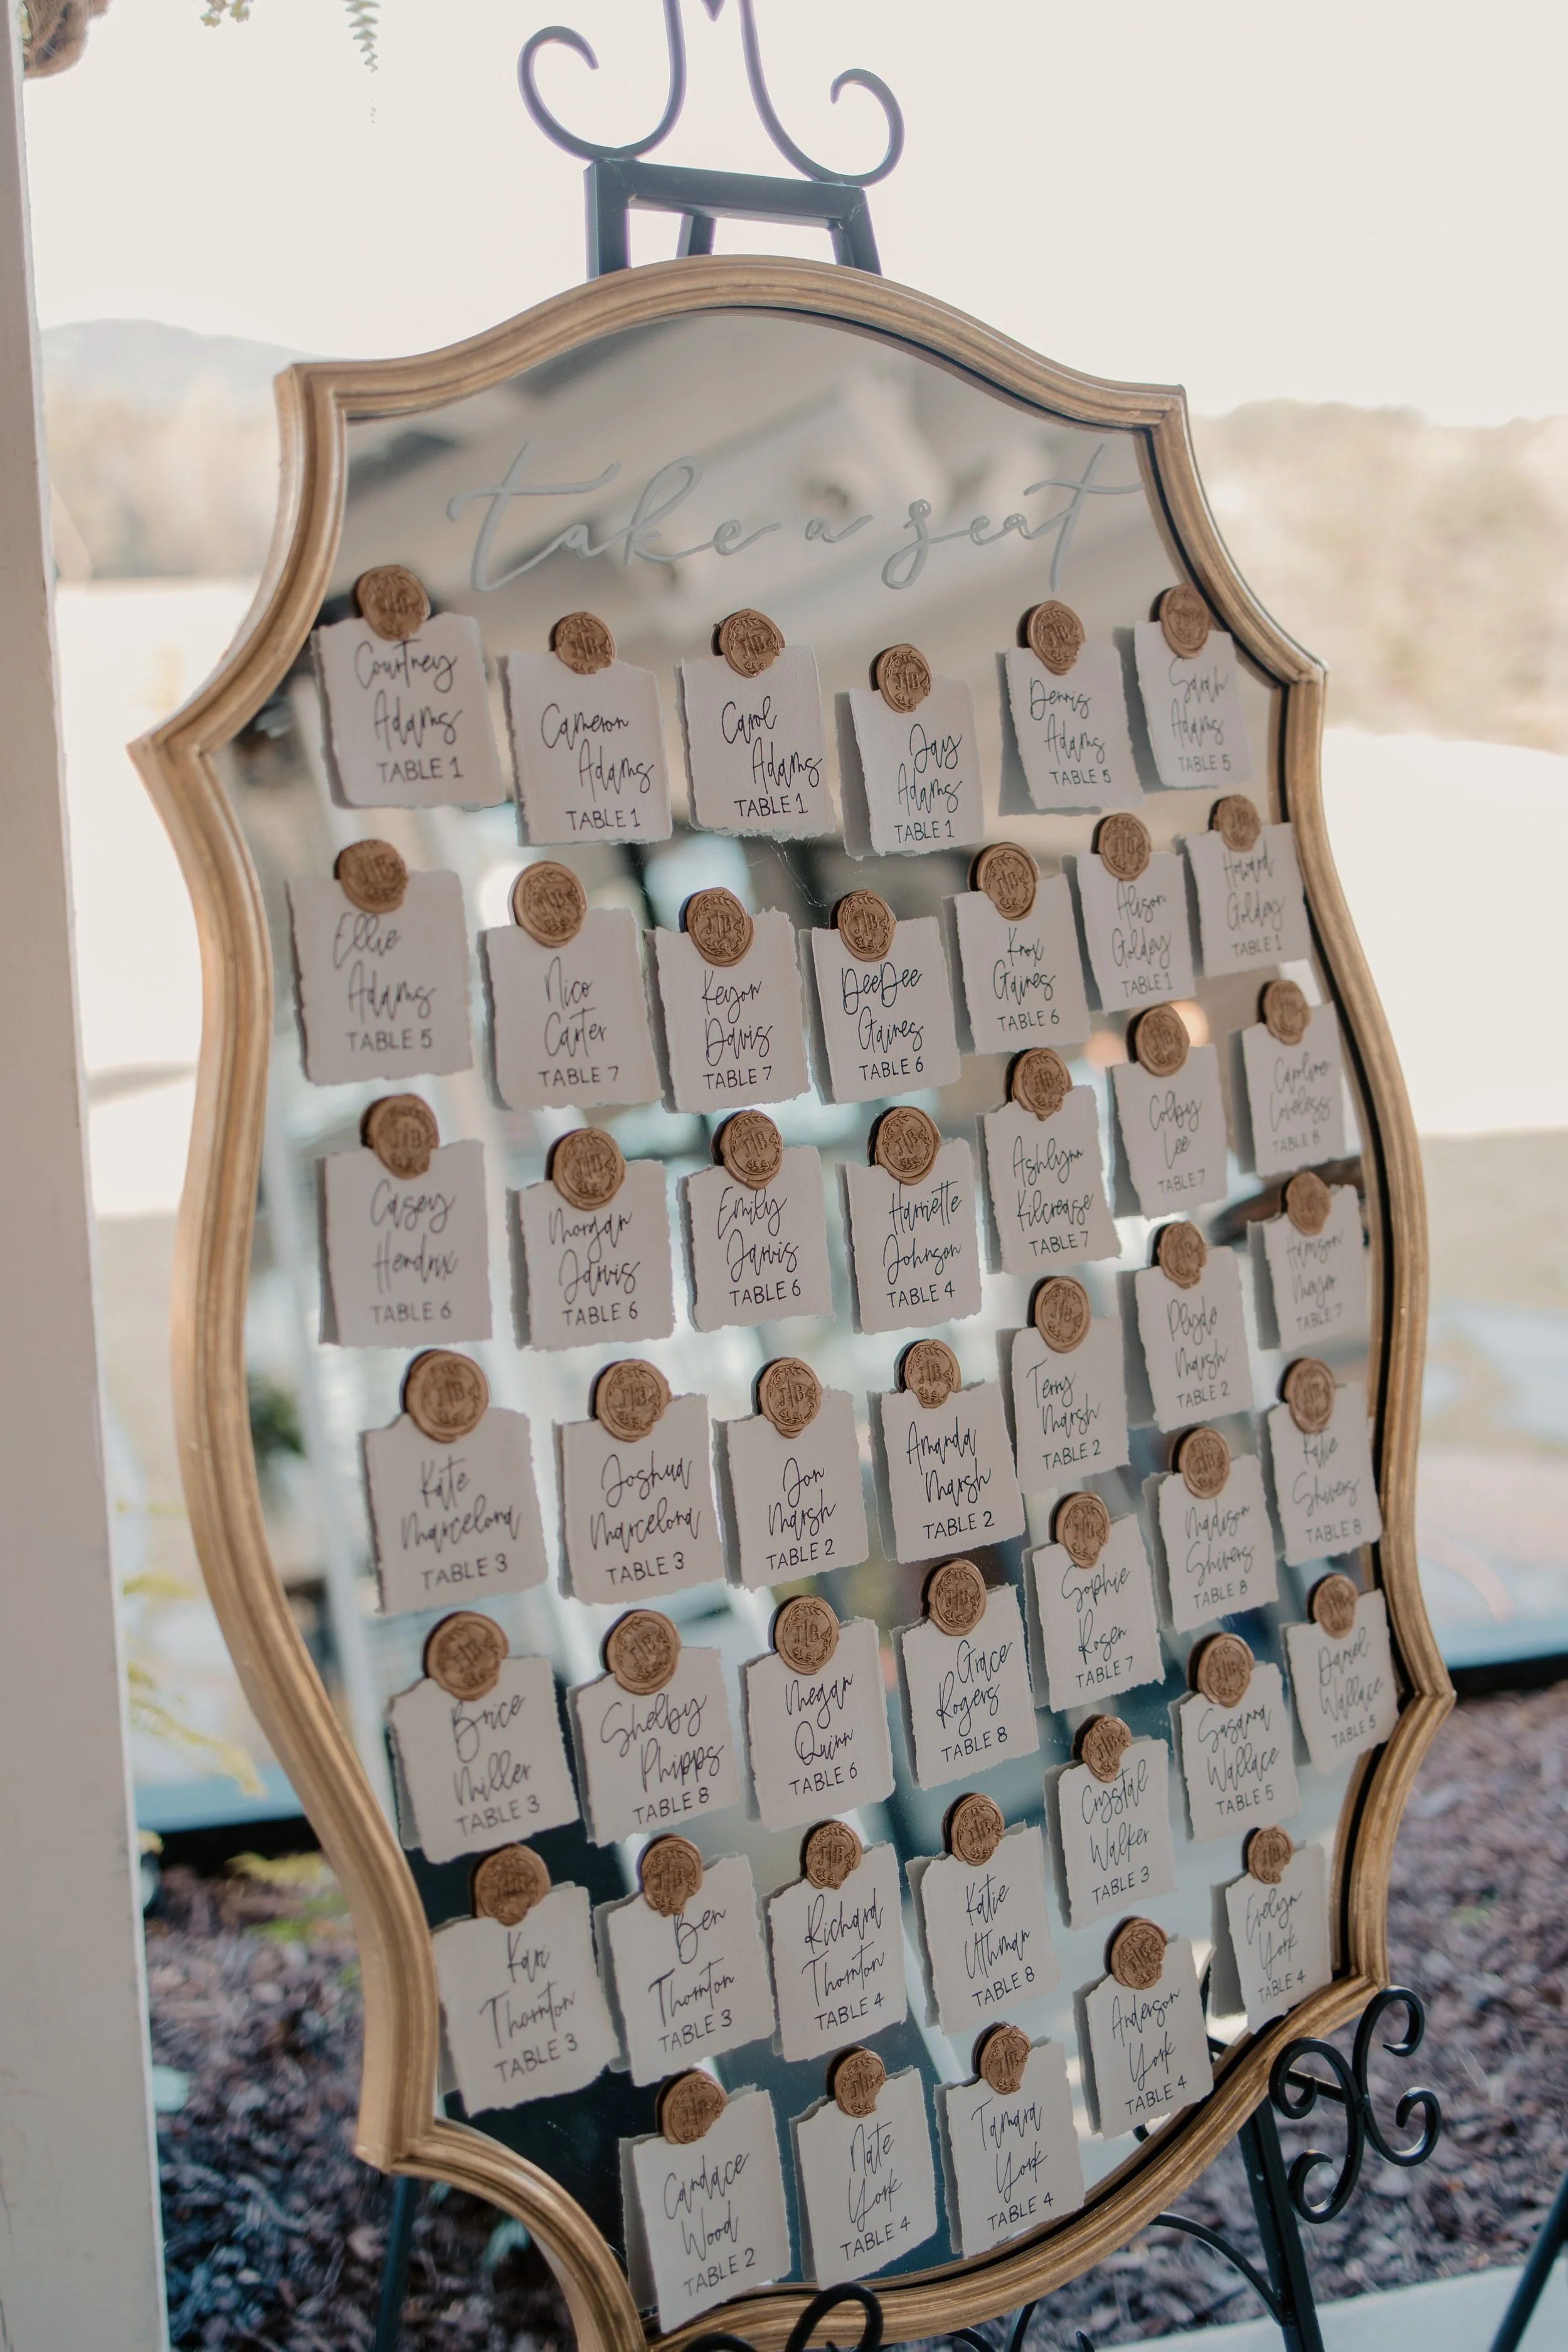
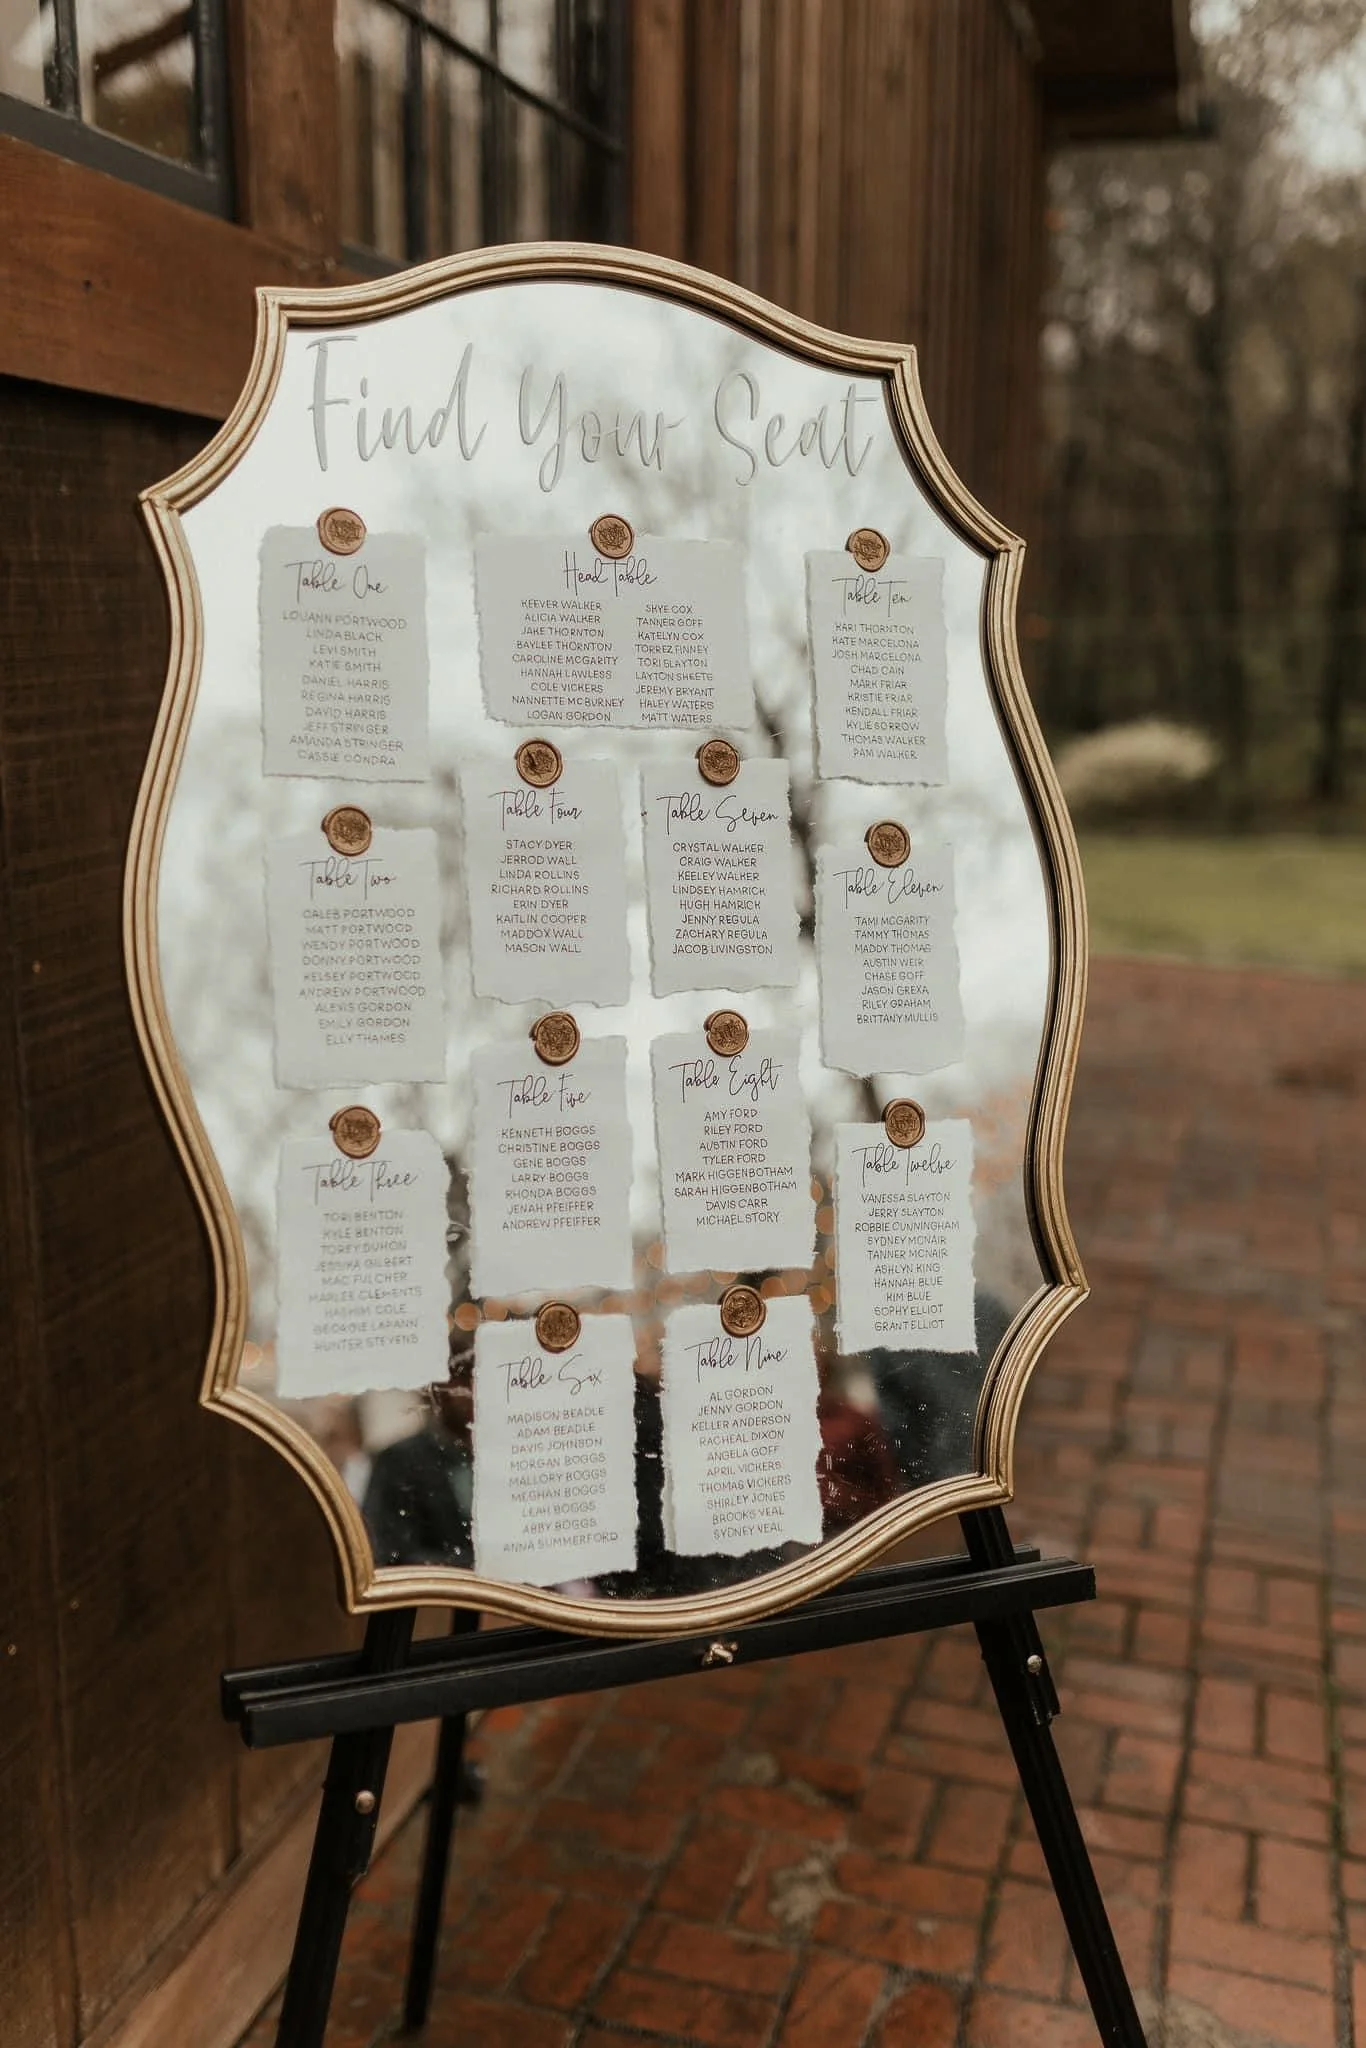
Mirror Seating Chart
Mirror (at least 24”x36”) - below are some recommendations
Wax Seal Stickers (or wax seal + wax sticks)
This mirror seating chart is one of my favorite DIY projects from our wedding, and I’ve since recreated it for several friends. It looks elevated, photographs beautifully, and can be done for a fraction of the cost of most custom seating charts. Even better, you can actually use the mirror in your home afterward instead of storing it away forever. If you don’t want to use a mirror, you can also do this with a sheet of plexiglass (see below example).
To start, source a mirror that’s at least 24” x 36”. I highly recommend choosing one you’ll genuinely want to keep after the wedding. This particular mirror was from Walmart and has lived multiple lives over the years. I used it for signage at our wedding, reused it for friends’ weddings, and eventually hung it in our home.
Next, decide how you want to organize your seating chart. You can group guests by table, like the example shown above, or list names alphabetically, like the example shown here.
For table-based layouts, I used 5” x 7” deckled-edge paper. When I did an alphabetical layout for a smaller wedding, I hand-ripped the paper into smaller squares. I typically only recommend the individual alphabetical method for lower guest counts.
For the names, I hand-wrote each guest’s name and table assignment. If you want a more uniform look, you can design the cards in Google Docs or Canva using your preferred font, print them, and trace over the lettering with a fine-tip pen. This gives you the polish of printed type with the warmth of hand lettering.
Before attaching anything, lay all of the paper pieces out directly on the mirror. This step is key. It allows you to adjust spacing, alignment, and overall balance, and it ensures you leave enough room at the top for a greeting. Once everything is positioned the way you like it, add your header. I used a white paint pen to write the greeting directly on the mirror to the right, but vinyl lettering works beautifully too (as shown in the example above). If you don’t have access to a Cricut, Etsy has tons of affordable custom options for vinyl lettering. Just be sure to measure your space first so the lettering fits comfortably.
To secure the cards, I used a wax seal and hot glue wax sticks, pressing each seal by hand. This worked well for me since I already had leftover wax and a seal from our invitation suite. If you’re starting from scratch, wax seal stickers are an easier and quicker alternative and still give the same elevated look.
Once everything is finished, display the mirror on an easel near your reception entrance. Many venues provide easels, but if not, local event rental companies are an easy solution. The end result is a beautiful, functional seating chart that feels custom, costs far less than a professionally made piece, and can be reused long after the wedding day is over.
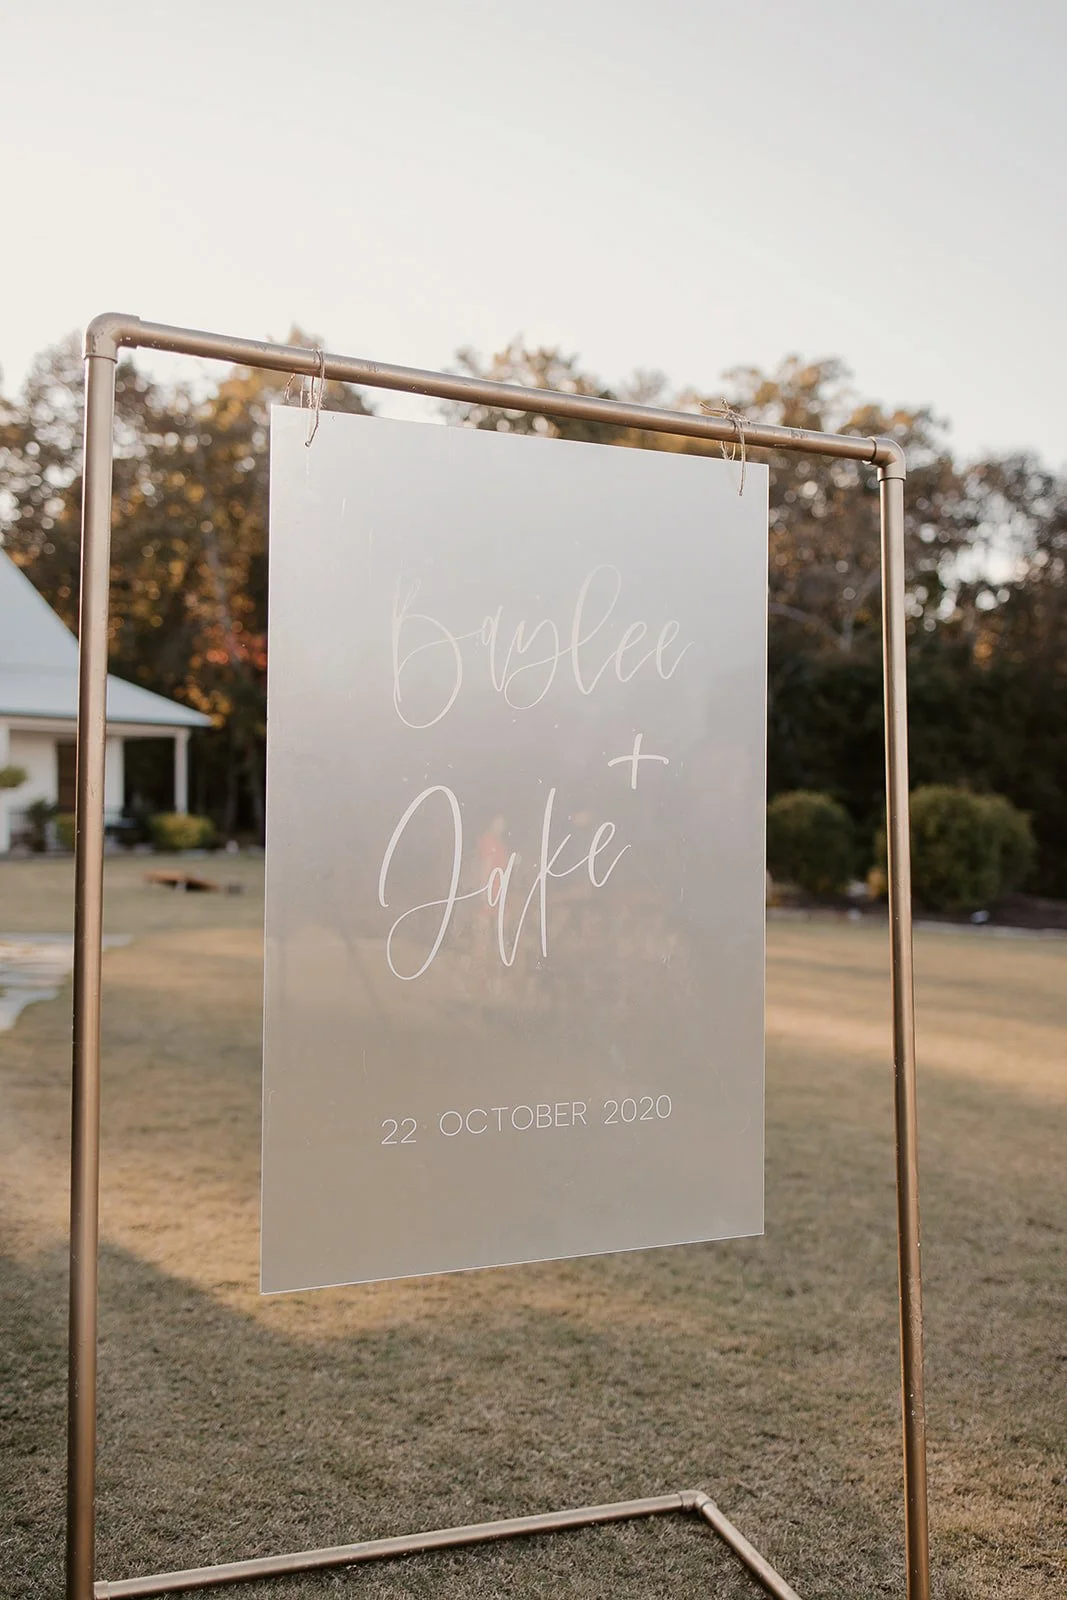
Plexiglass + PVC Pipe
Chart Materials:
Plexiglass Sheet (at least 24”x36”)
Wax Seal Stickers (or wax seal + wax sticks)
This method can be approached in a few different ways, depending on how detailed you want your final sign to be. The example pictured here uses vinyl decals applied directly to frosted plexiglass, which I made using my Cricut. If you don’t have access to a Cricut, you can absolutely purchase custom vinyl decals from sellers on Etsy instead. Either way, the key to making this look clean and intentional is planning the sizing before you touch the plexiglass.
Before creating or ordering any vinyl, I recommend mocking everything up in Canva. Create a custom document sized to 24” x 36” and design your seating chart or welcome sign there first. This allows you to see how large each element needs to be and gives you exact measurements for your vinyl lettering. Taking the time to do this step will save you a lot of frustration later and ensures everything fits proportionally on the plexiglass.
Once your vinyl pieces are ready, use transfer tape to carefully place each element onto the plexiglass. Smooth everything down slowly to avoid bubbles, then remove the transfer tape to reveal the finished design. Plexiglass is forgiving, but patience here makes all the difference in achieving a professional-looking result.
While this method works beautifully for welcome signs and simple headers, it can become very tedious if you’re trying to apply dozens of individual guest names or table assignments entirely in vinyl. For seating charts, I often recommend using vinyl only for the header or title and then pairing it with paper escort cards, wax seals, or another attachment method for the individual names. Alternatively, this approach works best for less text-heavy designs where the plexiglass itself is meant to be the statement.
When done thoughtfully, plexiglass signage feels modern, elevated, and incredibly versatile, and it’s a great option if you want something sleek without committing to fully printed signage.
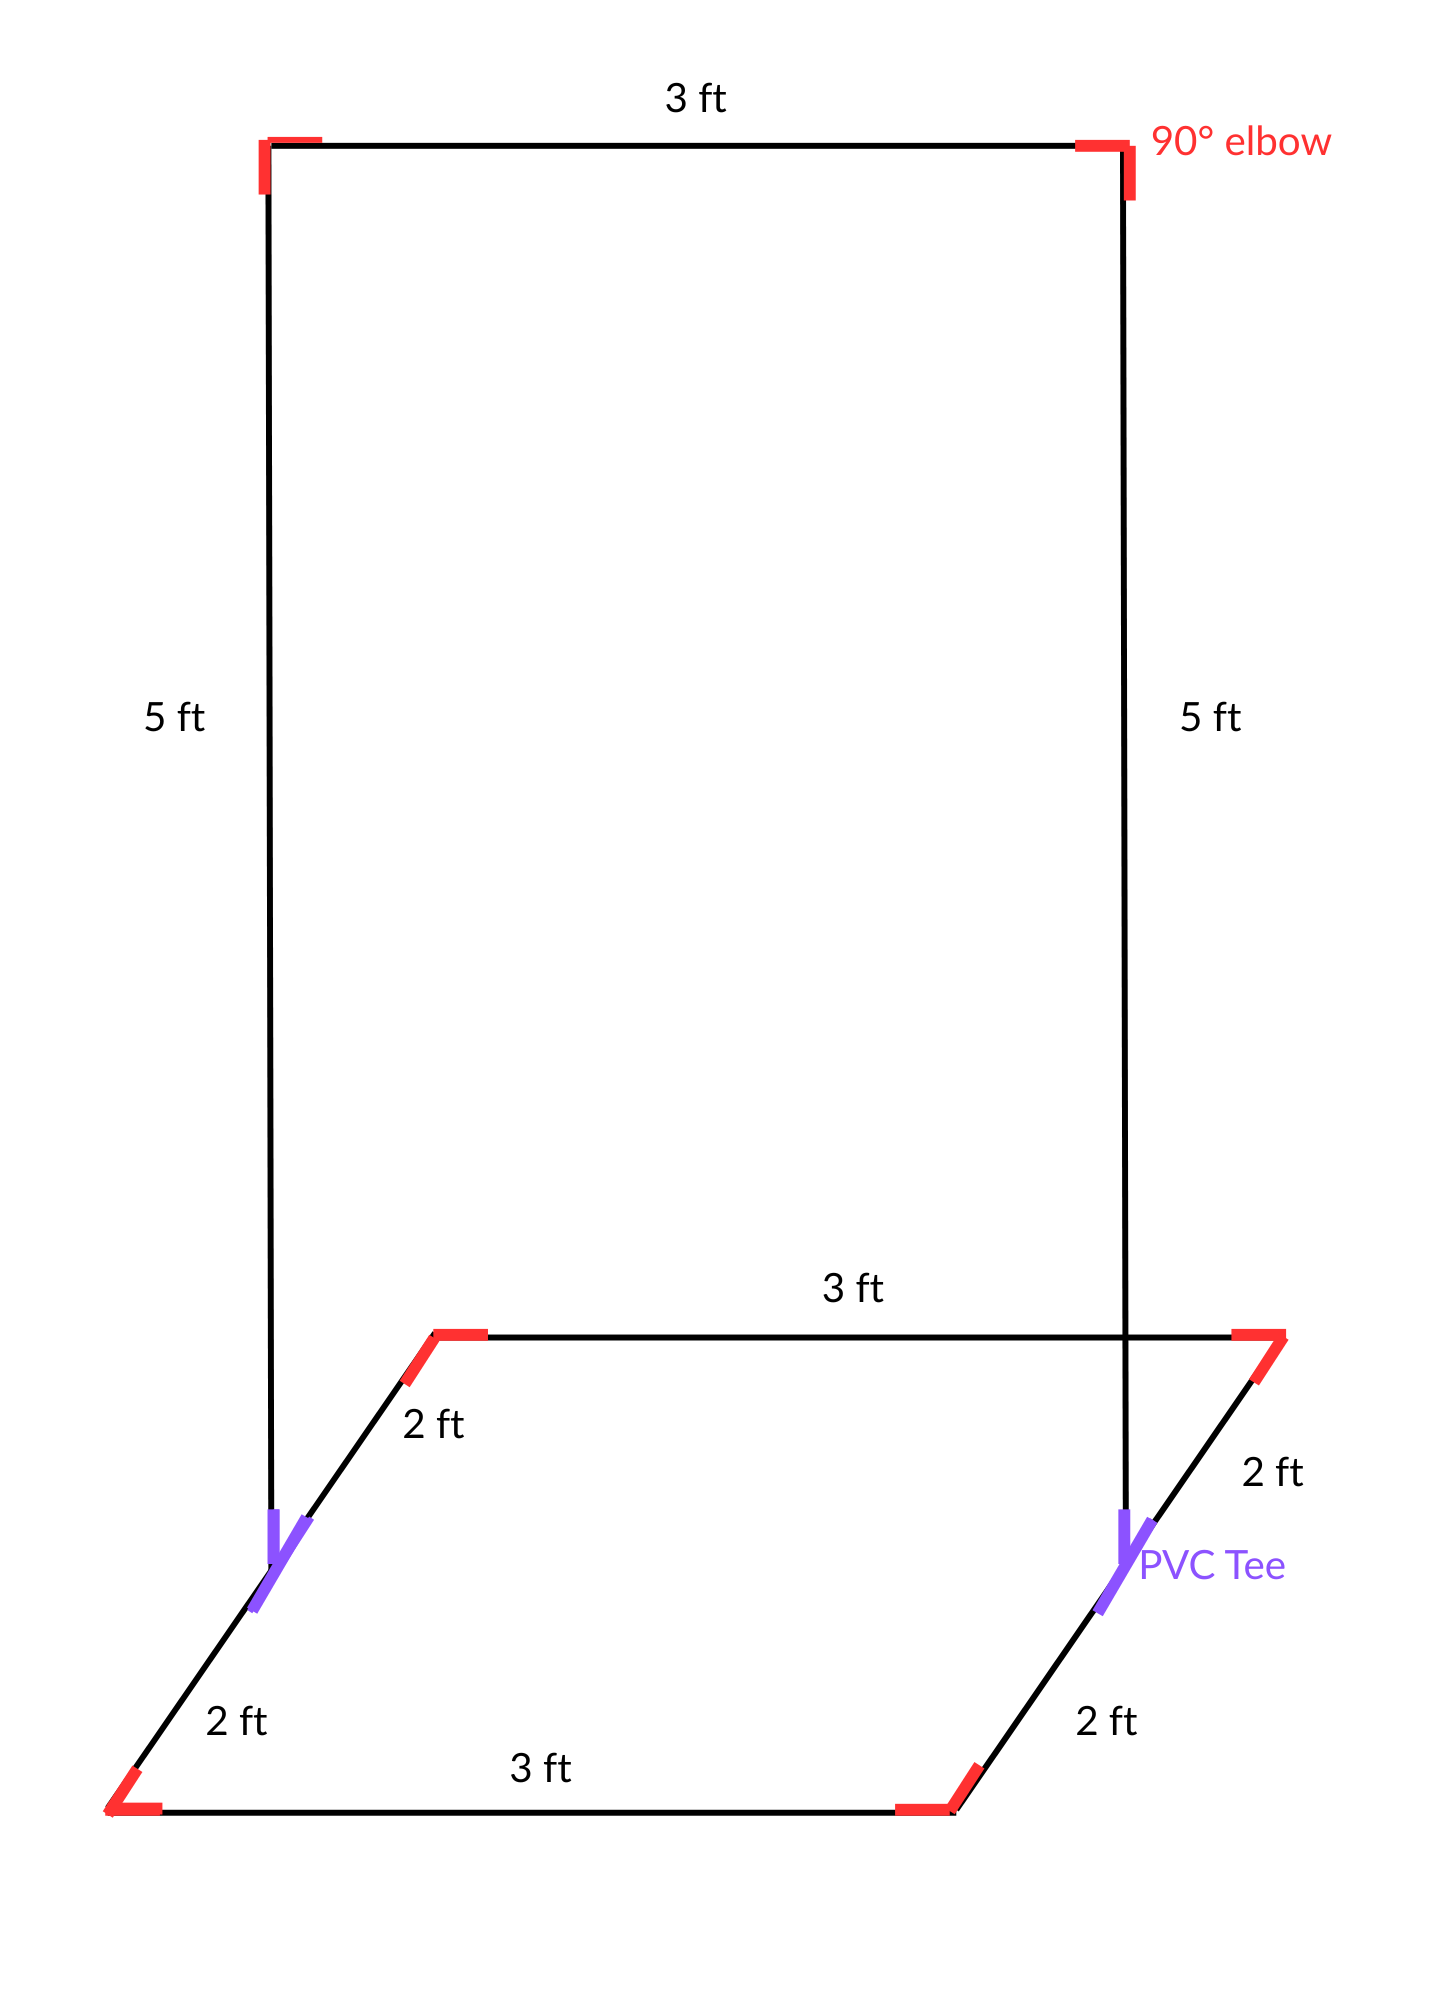
Stand Materials:
(3) 10-foot 2” diameter PVC Pipe (cut to below lengths by hardware store worker)
(3) 3-foot pieces
(2) 5-foot pieces
(4) 2-foot pieces
Spray Paint + Sealer
For the pipe stand, you’ll want to start by purchasing three 10-foot PVC pipes in a 2” diameter. This design uses a total of 27 feet of pipe, so three full-length pipes gives you just enough material with a small amount left over. When you’re at the hardware store, ask an associate to cut the pipes for you, most stores will do this for free. You’ll need three 3-foot pieces, two 5-foot pieces, and four 2-foot pieces. After all of your cuts, you should have a small leftover piece (around 3 inches) that won’t be used.
Next, pick up the necessary PVC connectors: six 90-degree elbows and two PVC tee fittings. The most important thing to double-check here is that every single piece is the same diameter so everything fits together properly. In the diagram, the PVC pipes are shown in black, the six elbows are highlighted in red, and the two tees are shown in purple to make assembly easier to visualize.
Assembly itself is very straightforward and does not require any adhesive. Simply fit the pipes, elbows, and tees together following the diagram. Keeping everything friction-fit (instead of glued) allows you to take the stand apart easily for transport and reassemble it later, which is especially helpful for weddings and events. You can do a test assembly indoors or wherever you have space, but once you’re ready to paint, fully assemble the stand outside.
For finishing, use spray paint in your desired color, one can is typically enough for full coverage. I used a gold finish for this stand, but black is another popular option and looks just as clean. After the paint has fully dried, apply a clear sealant to protect the finish and help prevent chipping during transport and reassembly.
This stand is designed to hold lightweight items like plexiglass signs or mounted poster boards, and I wouldn’t recommend hanging anything heavier than about 10 pounds. If you plan to use it outdoors, it’s a good idea to place heavier décor elements such as floral arrangements, planters, or weights on the base to help stabilize it and prevent wind from tipping it over.
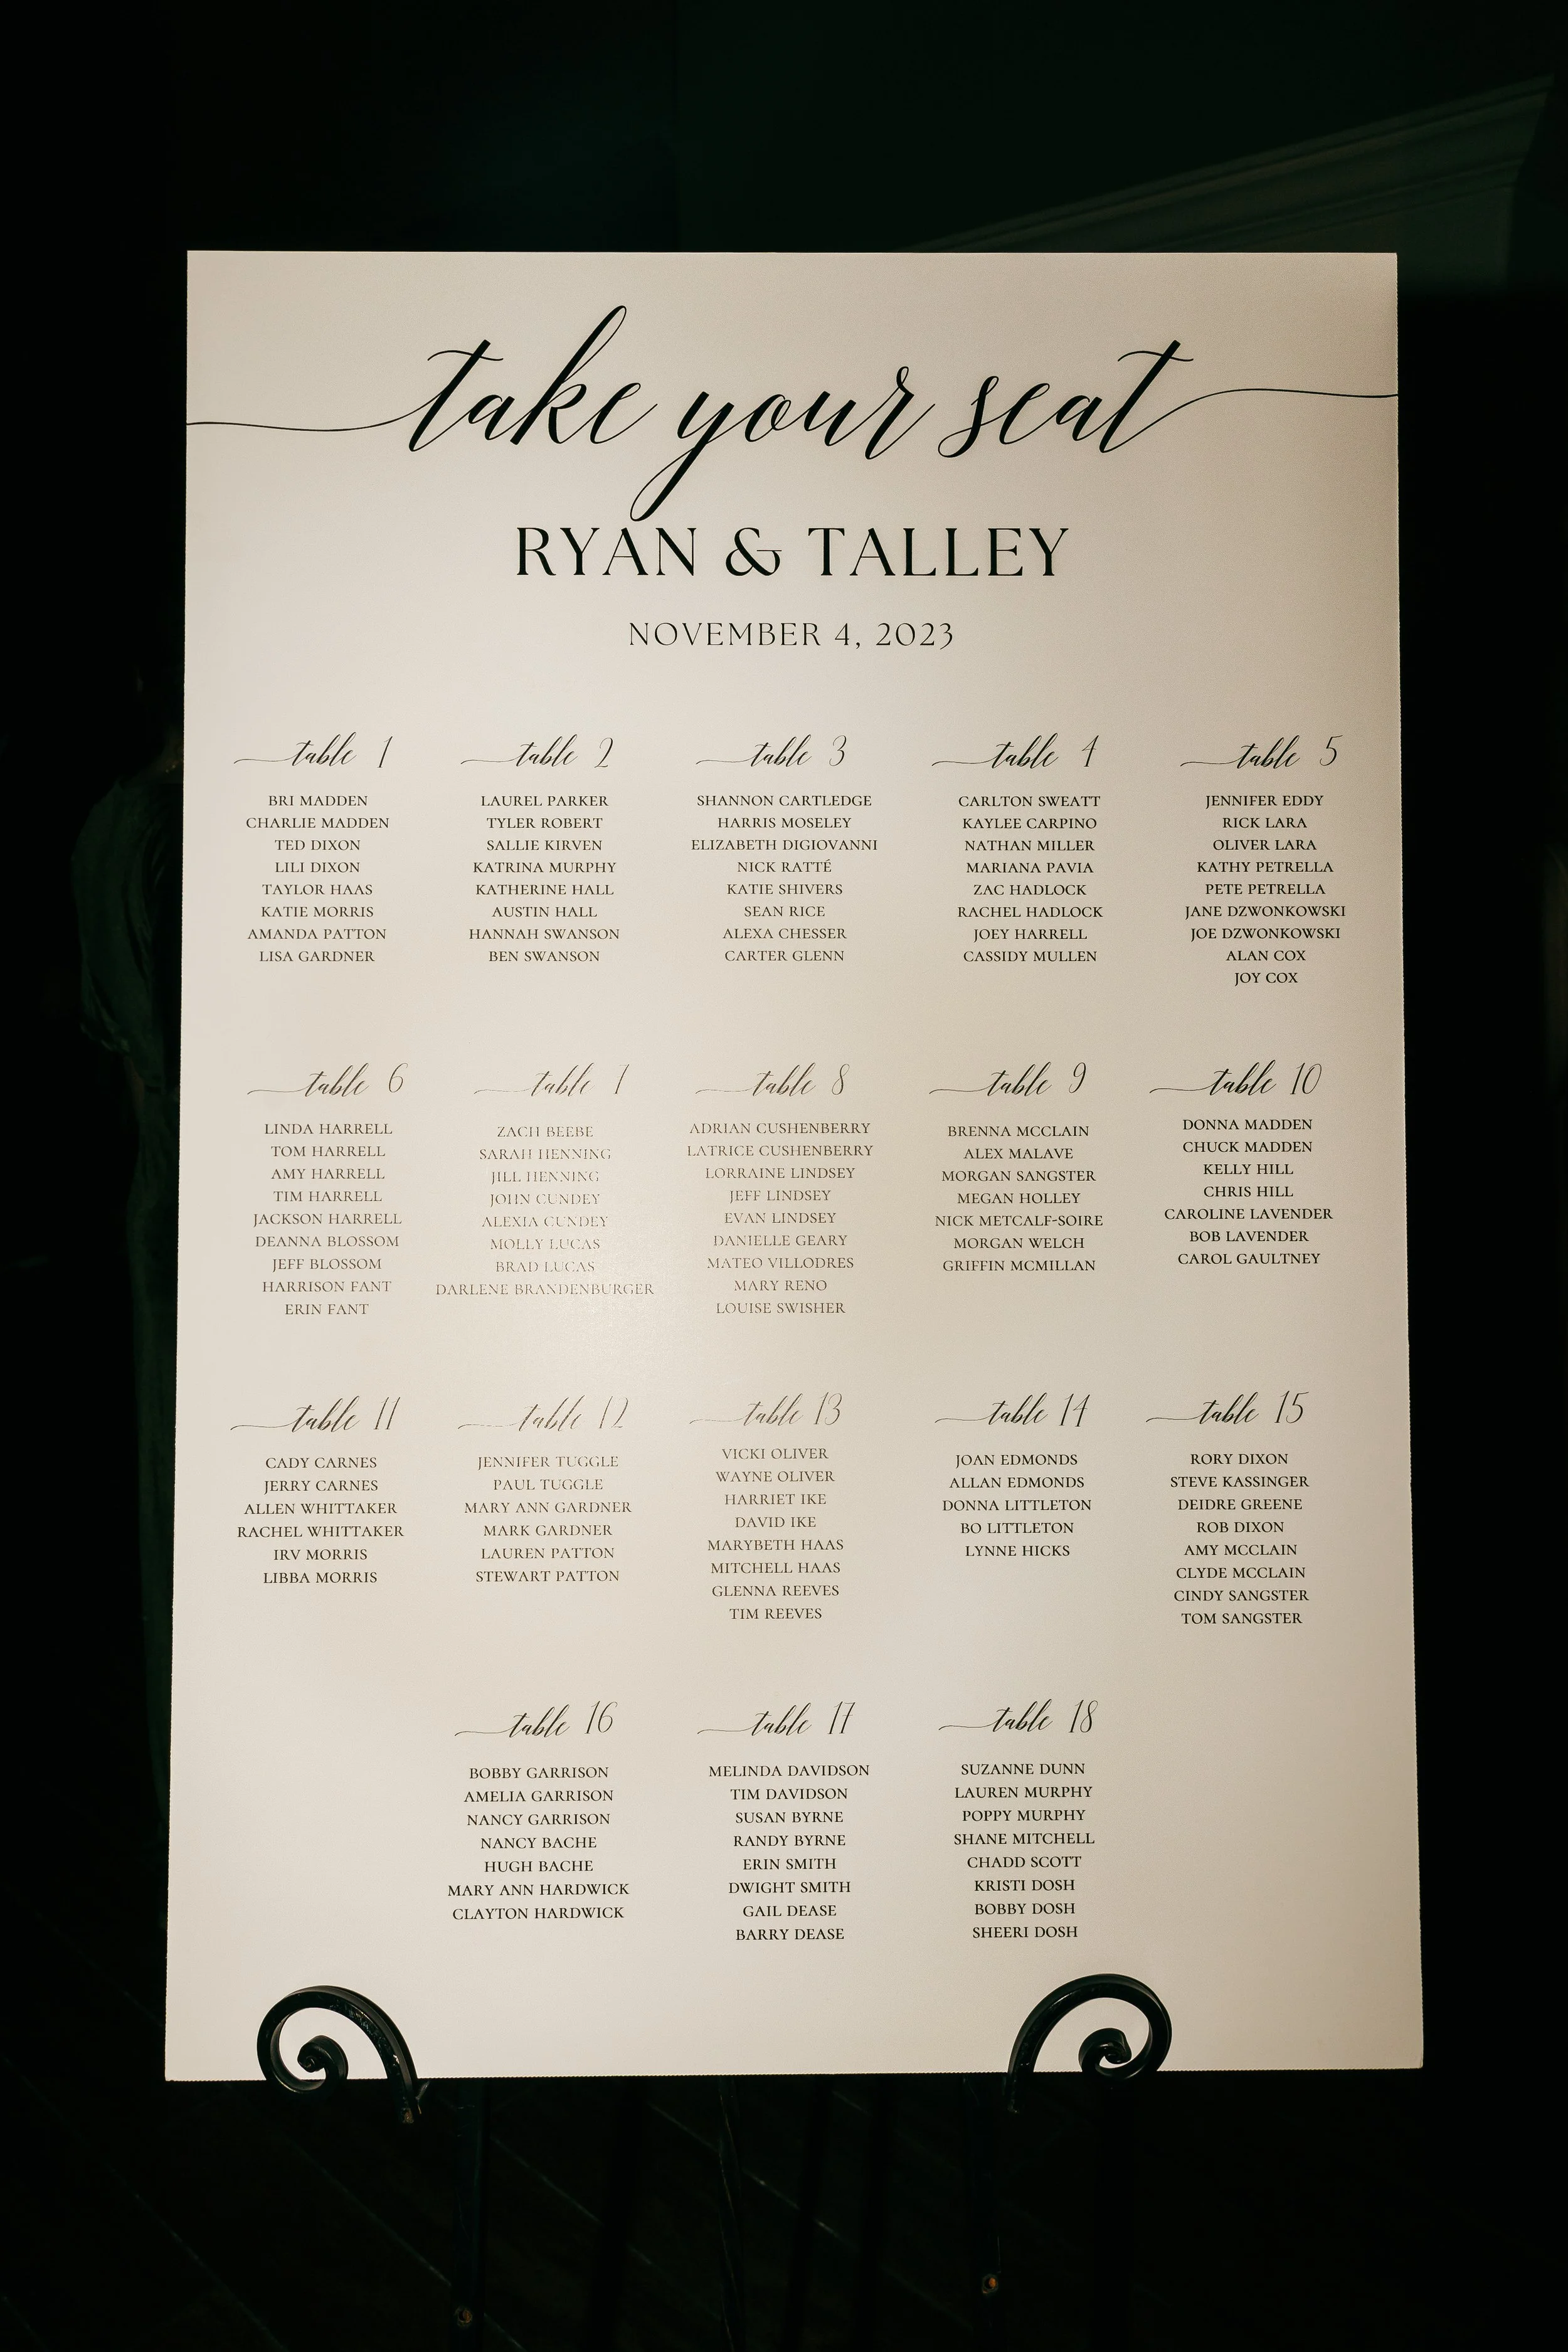
Digitally Printed Seating Chart
This is by far the simplest and most cost-effective seating chart option, because it requires very few materials and minimal time. All you really need is a digital design platform like Canva and access to an office supply store such as Staples, FedEx, or Office Depot. Canva is free to use and works on both your phone and computer, though a Pro subscription can be helpful if you want access to additional fonts, templates, and design elements.
For this method, I’ll assume you’re using Canva. Start by creating a new custom-sized document and set the dimensions to 24” x 36”, which is the most common and easiest size for large poster printing. From there, you can search “Seating Chart” within Canva’s templates to browse pre-designed layouts, or you can build your design entirely from scratch. Customize the fonts, spacing, layout, and wording until it fits your wedding aesthetic. Take your time adjusting alignment and sizing so everything feels balanced and easy to read.
Once your design is finished, download the file as either a PDF or a JPG. PDFs tend to be the safest option for printing, but either format works well. Next, head to the website of your preferred office supply store and navigate to their printing section. Look for options labeled something like “Foam Board Posters” or “Mounted Posters.” Select a 24” x 36” size in portrait orientation, upload your file, and choose whether you want in-store pickup or delivery. Pricing can vary, so it’s worth checking a few stores or keeping an eye out for sales.
Once it’s printed, you’ll have a clean, professional seating chart that looks polished and intentional without the custom price tag. Pair it with an easel from your venue or a local rental company, and you’re done!
closing paragraph